How to Clean Your Bug Zapper: A Comprehensive Guide for a Bug-Free Environment
Maintaining a bug-free environment is crucial for any home or business. One effective tool to achieve this is a bug zapper. However, over time, these devices can get clogged and dirty, which can hinder their performance.


So, how can you ensure your bug zapper stays in top shape? In this discussion, we will explore the necessary steps to properly maintain your bug zapper, so it can function optimally and keep those pesky insects at bay.
From gathering the materials you'll need to reassembling and testing the bug zapper, we'll provide you with a comprehensive guide that will leave you with a bug zapper that works like new.
So, let's dive in and learn how to clean your bug zapper effectively.
Gather Necessary Materials
To begin cleaning a bug zapper, gather the necessary materials. Removing grime from a bug zapper is essential for its optimal performance. Before starting the cleaning process, make sure to have the following items on hand:
- Safety gloves: Protect your hands from any potential electrical shocks or harmful chemicals present during the cleaning process.
- Soft cloth or sponge: Use a non-abrasive cloth or sponge to wipe away dirt and grime from the bug zapper's surface. This will prevent any damage to the delicate components.
- Mild cleaning solution: Choosing the right cleaning solution is crucial to avoid damaging the bug zapper. Opt for a mild, non-toxic cleaner that is suitable for use on electrical equipment. Avoid using harsh chemicals or abrasive cleaners as they can corrode the zapper's components.
- Water source: Ensure you have access to a water source, such as a sink or hose, to rinse off the bug zapper after cleaning.
Turn off and Unplug the Bug Zapper
Before proceeding with the cleaning process, it is important to first turn off and unplug the bug zapper to ensure safety and prevent any potential damage. Unplugging the bug zapper not only protects you from accidental electric shock but also prevents any interference with the cleaning process. Taking safety precautions is crucial when dealing with electrical appliances.
To turn off the bug zapper, locate the power switch or button and switch it to the 'off' position. Some bug zappers may have a separate power cord that needs to be unplugged from the electrical outlet. Make sure to follow the manufacturer's instructions for your specific bug zapper model.
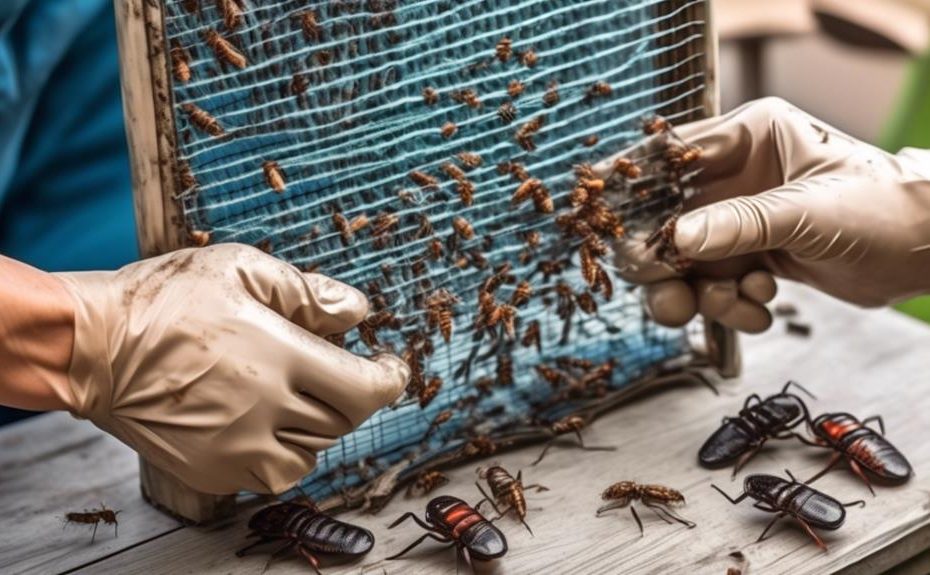
Remove the Dead Bugs and Debris
Begin by clearing out any dead bugs and debris from the bug zapper. This step is crucial to ensure the smooth functioning of the device and maintain its effectiveness in attracting and eliminating insects.
Here are three cleaning techniques and maintenance tips to help you remove the dead bugs and debris effectively:
- Turn off and unplug the bug zapper: Before starting the cleaning process, make sure the bug zapper is turned off and unplugged. This will ensure your safety and prevent any potential accidents while handling the device.
- Use a soft brush or vacuum cleaner: Gently brush off the dead bugs and debris from the bug zapper using a soft brush or a vacuum cleaner with a brush attachment. Be careful not to damage the delicate components of the device while cleaning.
- Wipe down with a damp cloth: After removing the visible dead bugs and debris, use a damp cloth to wipe down the bug zapper's surfaces. This will help remove any remaining residue and maintain the cleanliness of the device.
Clean the Bug Zapper's Surface and Inner Components
Cleaning the bug zapper's surface and inner components is essential for maintaining its efficiency and prolonging its lifespan. To ensure optimal performance, it is crucial to regularly clean these areas using proper cleaning techniques and maintenance tips.
Start by disconnecting the bug zapper from the power source and allowing it to cool down completely. Once cooled, use a soft cloth or sponge dampened with mild soapy water to gently wipe the surface of the bug zapper. Avoid using abrasive cleaners or harsh chemicals, as they can damage the device.
Next, remove the outer cover or grille to access the inner components. Carefully inspect the wiring and electrical connections for any signs of damage or loose connections. If any issues are detected, consult the manufacturer or a professional for repairs.
To clean the inner components, use compressed air or a soft brush to remove any dust, debris, or dead insects that may have accumulated. Take extra care when handling delicate parts to avoid causing any damage.
After cleaning, reassemble the bug zapper and ensure all connections are secure. Finally, plug the device back in and test its functionality.
Regularly cleaning the bug zapper's surface and inner components not only improves its efficiency but also helps prolong its lifespan. By following these cleaning techniques and maintenance tips, you can ensure your bug zapper remains effective in eliminating pesky insects.
Reassemble and Test the Bug Zapper
To reassemble the bug zapper, carefully follow the manufacturer's instructions and ensure all components are securely in place. Here is a step-by-step guide to guide you through the reassemble process and testing accuracy:
- Attach the grid: Position the grid onto the bug zapper's frame and secure it using the provided screws or fasteners. Make sure it is tightly secured to ensure proper functioning.
- Install the bulbs: Insert the UV bulbs into their designated sockets, ensuring they are properly aligned and fully inserted. Double-check that the bulbs are securely in place to avoid any electrical hazards during operation.
- Reattach the outer cover: Carefully align the outer cover with the bug zapper's frame and snap it into place. Ensure all the tabs and clips are securely fastened to prevent any insects from escaping or tampering with the unit.
Once the reassembly is complete, it is crucial to test the bug zapper's accuracy. Connect the bug zapper to a power source and switch it on. Observe if the grid lights up and emits a faint humming sound. Verify that the UV bulbs are functioning correctly by checking for the characteristic purple glow. Additionally, monitor the bug zapper's ability to attract and trap insects.
If any issues arise during the testing process, consult the manufacturer's instructions or seek professional assistance.
Frequently Asked Questions
How Often Should I Clean My Bug Zapper?
Regular maintenance is crucial for bug zappers to ensure their optimal performance. Signs that indicate it's time to clean your bug zapper include reduced effectiveness in attracting and killing bugs, accumulation of dead insects, and visible dirt or debris.
Can I Use Water to Clean the Bug Zapper?
Water can be used to clean a bug zapper, but caution must be exercised to avoid damaging the electrical components. It is advisable to follow the manufacturer's instructions and consider alternative cleaning methods or solutions for optimal maintenance.
What Should I Do if the Bug Zapper Is Not Working After Cleaning?
If the bug zapper is not working after cleaning, there may be common bug zapper problems that require troubleshooting. Check for any loose connections, ensure proper power supply, and inspect for any damaged components that may need to be replaced.
Are There Any Specific Cleaning Products I Should Use for the Bug Zapper?
When cleaning a bug zapper, it is important to use appropriate cleaning products that are safe for the device. However, there are alternative methods that can also effectively clean the bug zapper.
Can I Clean the Bug Zapper While It Is Still Plugged In?
Cleaning precautions should always be taken into consideration when cleaning a bug zapper. It is not recommended to clean the bug zapper while it is still plugged in. It is best to unplug and follow the manufacturer's instructions for cleaning techniques.
Conclusion
In conclusion, cleaning a bug zapper is a simple and necessary task to maintain its efficiency. By following the steps outlined above, you can easily remove debris, clean the surface and inner components, and reassemble the bug zapper for optimal performance.
Remember, just like the bugs it zaps, a well-maintained bug zapper is a powerful and effective tool in keeping your outdoor spaces bug-free. So, take the time to give your bug zapper some TLC and enjoy bug-free evenings.