How to Keep your Bug Zapper Clean and Effective
Bug zappers are a must-have when it comes to tackling those annoying insects that invade our outdoor spaces. They provide a much-needed sense of relief and tranquility.


But just like any other electrical device, bug zappers need regular maintenance to ensure they work at their best and last for a long time. Cleaning a bug zapper may sound like a small task, but it's important to follow the correct procedures to ensure safety and effectiveness.
In this guide, we'll take you through a step-by-step process of cleaning your bug zapper, from gathering the necessary supplies to testing the device after reassembly. By learning the proper cleaning techniques, you'll not only boost your bug zapper's performance but also create an environment free from those pesky bugs.
So let's dive in and discover how to keep your bug zapper in top shape!
Gather Necessary Supplies
To begin the process of cleaning a bug zapper, it is essential to gather the necessary supplies. Having the right tools at hand will ensure an efficient and thorough cleaning, allowing the bug zapper to function optimally. The cleaning techniques and maintenance tips outlined in this article will help keep your bug zapper in top condition.
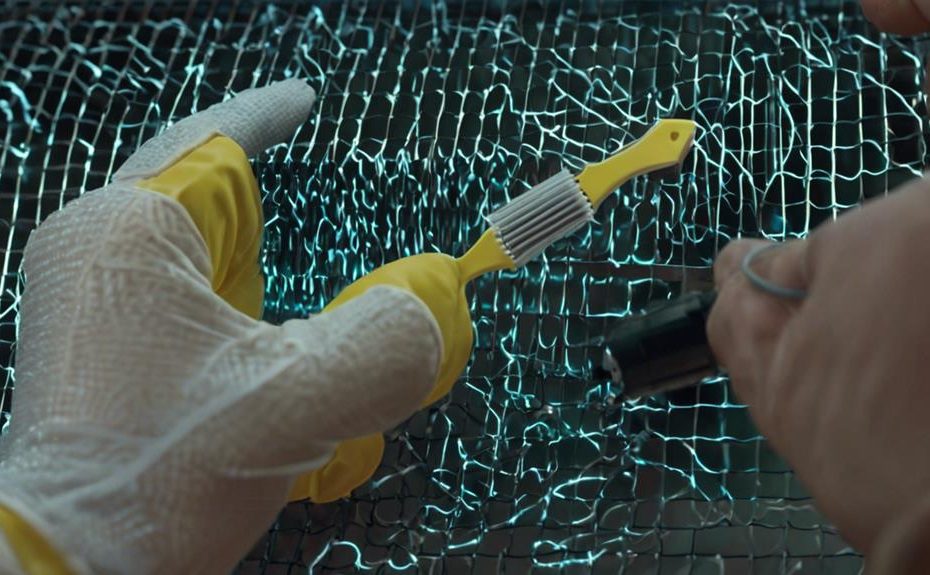
Firstly, you will need a soft-bristled brush or a toothbrush to remove any debris or dead insects that may have accumulated on the grid. Gently scrubbing the grid will dislodge any stuck particles without damaging the delicate wiring.
Next, prepare a mixture of warm water and mild dish soap. This solution will act as a cleaning agent to remove any dirt or grime that has built up on the outer casing of the bug zapper. Using a sponge or cloth, carefully wipe down the surface, ensuring that no water enters the electrical components.
Additionally, having a can of compressed air is useful for blowing away any remaining dust or debris from the internal components of the bug zapper. This step will help maintain the effectiveness and longevity of the unit.
Turn off and Unplug Bug Zapper
Before beginning the process of cleaning a bug zapper, it is crucial to ensure that the unit is turned off and unplugged to prevent any potential accidents or electrical shock. Safety precautions should always be the top priority when handling any electrical appliance.
To turn off the bug zapper, locate the power switch or button and make sure it is in the 'off' position. Next, unplug the unit from the power source. This step eliminates the risk of electric shock while cleaning and reduces the chances of damaging the bug zapper or its components.
Once the bug zapper is turned off and unplugged, it is important to handle it with care. Avoid touching the electrified grid or any other internal components, as they may still hold residual electrical charge.
To maintain the bug zapper's performance and prolong its lifespan, proper storage is essential. After cleaning and drying the unit, store it in a cool, dry place away from direct sunlight or extreme temperatures. This will help prevent damage and ensure its effectiveness when it is needed again.
Remove and Clean the Insect Collection Tray
After ensuring that the bug zapper is turned off and unplugged, the next step in the cleaning process involves removing and cleaning the insect collection tray. The insect collection tray is an essential component of the bug zapper, as it collects the insects that are electrocuted by the device. Regular maintenance of the collection tray is crucial for the bug zapper to function effectively and efficiently.
To remove and clean the insect collection tray, follow these steps:
- Locate the collection tray beneath the bug zapper. It is usually positioned at the bottom of the device.
- Gently slide the tray out from its slot. Be cautious as it may contain dead insects.
- Dispose of the dead insects in a sealed bag or trash can.
- Rinse the collection tray with warm soapy water to remove any remaining debris or residue.
- Use a soft brush to scrub the tray, ensuring that all surfaces are thoroughly cleaned.
- Rinse the tray again to remove any soap residue.
- Allow the tray to air dry completely before reinserting it back into the bug zapper.
Regularly cleaning the insect collection tray not only helps maintain the bug zapper's efficiency but also prevents the buildup of dead insects and debris, which can attract pests and create unsanitary conditions. By incorporating this step into your cleaning process, you can ensure the bug zapper continues to effectively eliminate insects and provide a comfortable outdoor environment.
Clean the Outer Casing and Electrical Components
Cleaning the outer casing and electrical components of a bug zapper is an essential step in maintaining its functionality and ensuring optimal performance.
To clean the outer casing, begin by unplugging the bug zapper from the power source. Use a soft cloth or sponge dampened with mild soap and water to gently wipe down the exterior of the bug zapper. Avoid using harsh chemicals or abrasive materials that could damage the casing.
Next, focus on cleaning the bug zapper's UV light bulbs. These bulbs play a crucial role in attracting insects towards the device. Carefully remove the bulbs by following the manufacturer's instructions. Use a soft, dry cloth to wipe away any dust or debris that may have accumulated on the bulbs. If there are stubborn stains, you can use a damp cloth with mild soap. Ensure that the bulbs are completely dry before reinstalling them.
Maintaining the bug zapper's power source is equally important. Regularly check the power cord for any signs of wear or damage. If there are any issues, replace the cord immediately to avoid electrical hazards. Additionally, inspect the electrical components inside the bug zapper for any loose connections or corrosion. If necessary, tighten any loose connections and clean off any corrosion using a wire brush or a cloth dampened with a mixture of baking soda and water.
Reassemble and Test Bug Zapper
To reassemble and test the bug zapper, carefully follow the manufacturer's instructions and ensure all components are securely in place. The following steps will guide you through the reassembly process:
- Begin by reattaching the outer casing to the bug zapper. Make sure all screws or clips are tightened properly to ensure the casing is securely in place.
- Next, connect the electrical components according to the manufacturer's instructions. Double-check all connections to ensure they are secure and properly aligned.
- Once the bug zapper is fully reassembled, it is time to test its functionality. Plug the bug zapper into a power source and switch it on.
- Observe the bug zapper for any signs of malfunction. Pay attention to factors such as the UV light output, the electric grid, and any unusual noises or smells.
- If the bug zapper is not functioning properly, refer to the troubleshooting tips provided by the manufacturer. Common issues may include a blown fuse, loose wiring, or a faulty switch.
Following these steps and conducting a thorough testing procedure will help ensure that your bug zapper is functioning effectively and safely. Remember to always consult the manufacturer's instructions for specific guidance and troubleshooting tips.
Frequently Asked Questions
How Often Should I Clean My Bug Zapper?
To ensure optimal performance, it is recommended to clean your bug zapper regularly. The frequency of cleaning depends on various factors such as usage, location, and insect activity. Following best cleaning practices for bug zappers will help maintain its effectiveness.
Can I Use Any Cleaning Solution to Clean the Insect Collection Tray?
When it comes to cleaning the insect collection tray of a bug zapper, it is important to use cleaning solutions that are specifically designed for this purpose. Using the wrong cleaning solution can potentially damage the bug zapper. To effectively clean the bug zapper without causing any harm, it is recommended to follow the manufacturer's instructions and use a mild detergent or soapy water to clean the insect collection tray. Avoid using harsh chemicals or abrasive scrubbers, as they can scratch or corrode the surface of the bug zapper. Regular maintenance and cleaning of the insect collection tray will help ensure the bug zapper continues to work efficiently and effectively.
Is It Safe to Clean the Bug Zapper While It Is Still Plugged In?
Cleaning a bug zapper while it is still plugged in is not safe. To safely clean a bug zapper, first, unplug it from the power source, then follow the manufacturer's instructions for cleaning and maintenance.
Can I Use a Hose to Clean the Outer Casing and Electrical Components?
When it comes to cleaning a bug zapper, it is important to consider the best methods for cleaning the outer casing and electrical components. One option to consider is using a hose, but there may be alternative methods that are more suitable.
How Long Should I Wait Before Plugging in and Testing the Bug Zapper After Cleaning It?
After completing the cleaning process of a bug zapper, it is recommended to wait for a sufficient testing time before plugging it in. This ensures that any residual moisture has evaporated and the zapper is safe to use.
Conclusion
In conclusion, cleaning a bug zapper is a simple yet important task to maintain its efficiency. By following the steps outlined in this article, you can ensure that your bug zapper continues to effectively eliminate insects.
Taking the time to clean the insect collection tray, outer casing, and electrical components will not only improve the performance of the bug zapper but also extend its lifespan.
So, why wait? Start cleaning your bug zapper today and enjoy a bug-free environment.